Geocaching
Tuesday, May 18, 2010
Final Research Paper
According to Wikipedia, “geocaching is an outdoor activity in which the participants use a Global Positioning System receiver or other navigational techniques to hide and seek containers (“geocaches”) anywhere in the world.” In geocaching, you can either make and hide your own cache, or look up other caches to go find. They are hidden by using the GPS device to determine the coordinates of where the cache is hidden, for example the latitude and longitude of Victoria, Canada would be 48° 26’ 0” N 123° 21’ 0” W. You would enter these coordinates into your GPS device, and then continue using your GPS device to find exactly where that is. Geocaches are usually placed somewhere that is important or has some kind of meaning to the creator of the cache. Location of caches can be extremely diverse and can be found anywhere from underwater or on a cliff, to down the street from your house.
Geocachers have their own terminology and also sometimes use a code when writing in logbooks or in messages. An interesting term they use is the word “muggle” from the Harry Potter series. In this case a muggle is anybody who is not a geocacher. Also, the code they sometimes use is called ROT13, in which each letter of the alphabet is rotated 13 characters up or down. For example A = N, B = O, etc.
There are several different types of caches. Typically a cache might be a Tupperware container or some kind of sturdy, water/nature proof container, containing a log book (or log sheet in smaller caches), writing utensils, and maybe some other objects such as a toy car or some rocks; could be anything! The only rules of geocaching are that if you take an item out, replace the item with a new one, and always remember to write in the logbook! Generally when placing an item such as a toy or something, each item is put in it’s own Ziploc bag to help protect it from nature. In some caches people are looking to trade items or start a collection. One cache in the area was looking for people to trade buttons with, so they could help expand their collection. Caches are posted online for other geocachers so they can look up the coordinates, as well as read a description of the cache, read the log, and sometimes even get a hint as to where the cache is hidden.
Other types of items that may be found in a cache are trackable items. There are two kinds of trackable items: Groundspeak Travel Bugs®/hitchhikers and official Geocoins. A Groundspeak Travel Bug® is a tag etched with a unique code that is attached to an item, which travels from cache to cache with help from people who geocache. The unique code on the tag is used to track the item online so you can see where it’s been and maybe even where the original creator of this travel bug wants the item to go. A travel bug is also a good example of a hitchhiker, which works the same way as a travel bug but has some kind of instructions to travel to other caches. Geocoins are coins created by geocachers to remember a special event or as a signature item to leave in caches. Geocoins work the same way as the travel bugs and are moved from cache to cache and tracked online.
Another aspect of geocaching would be benchmarks. A benchmark is a location whose position is known extremely accurately and is usually marked somehow, usually by a metal disk made specifically for the benchmark, but can also be a church spire, radio tower, a mark chiseled into stone, or a metal rod driven into the ground. The benefit in finding and seeking a benchmark is to be able to take pictures and share them with other geocachers based on the benchmark’s unique code. The code on a benchmark works pretty much the same way as a trackable, but benchmarks are in a permanent location. Geocachers are able to take pictures around or of the benchmark and tag them using the code, and then are able to compare their pictures with others from the specific site of the benchmark.
References:
http://www.geocaching.com/faq/
http://en.wikipedia.org/wiki/Geocaching
Geocaching iPhone application
Final Studio Project
For my final studio project I decided to use Photoshop, Illustrator, and InDesign together to design a poster showing information about Antarctica and all the different research stations there. I wanted to find a way to map out Antarctica as well as showing which other countries are there and how many research stations they have, and where they are.


Wednesday, May 5, 2010
Final Paper Proposal
For my final paper I really wanted to learn more and write about Geocaching. Geocaching is a treasure hunting game that uses GPS and coordinates to locate the "treasure", or in this case, the cache. There are many types of caches, some which are containers containing a log book or other things, while others might just be a virtual cache, where there is actually nothing even in the area.
I find geocaching really interesting because I like the idea of treasure hunting and I always enjoy looking at a GPS screen being able to see where I am, and geocaching definitely combines the two things. I also find it really interesting and want to learn more about it and understand all the different types of caches.
In my paper I plan to address topics such as what exactly geocaching is, the different types of caches that exist, and other aspects of geocaching such as trackable items and bench marks.
Wednesday, April 28, 2010
Final Project and Final Paper
For both my final project and final paper, I wanted to look more into geocaching and see what it exactly is all about.
For the project I was thinking of setting up a series of geocaches around San Francisco and maybe creating a treasure map or some kind of game or something out of it. I would then design the map of San Francisco and incorporate my idea's for the game into the map using images, actual pictures i've taken, or maybe objects that I may have placed in some of the geocaches I have found or some of the ones I have set up.
For the paper, I wanted to do a lot of research on geocaching and write about the different aspects of it, such as trackables, bench marks, and caches themselves.
EDIT:
http://content.answers.com/main/content/img/BritannicaConcise/images/69737.gif
For my project I think I'm going to go in an entirely different direction and use the above map of Antarctica and figure out someway to map out the area and the idea that it is it's own continent, but at the same time, many countries from all over the world have claimed parts of it for research stations.
Tuesday, April 6, 2010
Chalk Car
Recently in the Villas next to campus as I was walking to class, I walked past a car that was painted in chalk paint and had chalk drawings all over the car. I thought this was really interesting, and as I got closer, I saw that whoever own's the car had somehow attached a box of chalk to their car by closing the window on it, so that anybody that walked by could pick up a piece of chalk and draw on the car!
I unfortunately didn't get a picture, and have yet to see the car again.
I would definitely draw on it next time I see it and just check it out to see if other people have drawn on it also.
I unfortunately didn't get a picture, and have yet to see the car again.
I would definitely draw on it next time I see it and just check it out to see if other people have drawn on it also.
Screen Printing Update
So over spring break I gathered my tracks from four different areas in Golden Gate Park:
-Hippie Hill
-Japanese Tea Gardens
-Music Concourse
-Shakespeare Garden
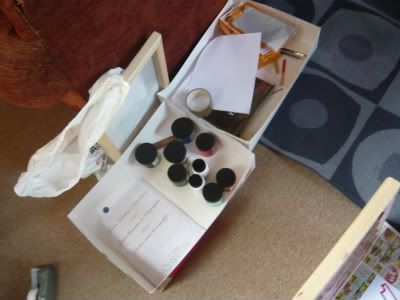
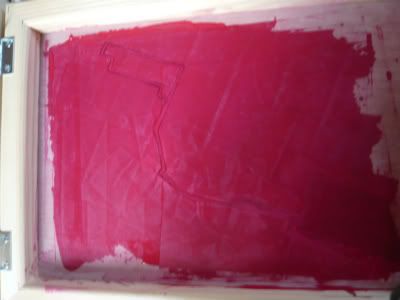
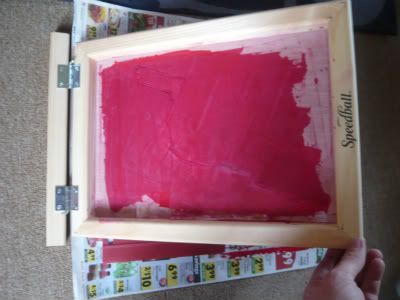
Last night I went to my friend's house and we made my first attempt at trying to use photo emulsion to create the screen, since my first attempt trying the screen filler method didn't work so well.
Unfortunately, the photo emulsion method take's a bit of time to prepare the screen, and we didn't let the images sit under the light long enough, so the design was never imprinted into the screen.
We will be making another attempt on Wednesday evening to try and make the screen so we can complete the shirt.
The four color's i've decided to use are the process colors, CMYK (Cayenne, Magenta, Yellow, and "Key line" (Black)). I haven't quite decided which track will be which color though.
Here is a picture from the attempt at photo emulsion:

-Hippie Hill
-Japanese Tea Gardens
-Music Concourse
-Shakespeare Garden
Last night I went to my friend's house and we made my first attempt at trying to use photo emulsion to create the screen, since my first attempt trying the screen filler method didn't work so well.
Unfortunately, the photo emulsion method take's a bit of time to prepare the screen, and we didn't let the images sit under the light long enough, so the design was never imprinted into the screen.
We will be making another attempt on Wednesday evening to try and make the screen so we can complete the shirt.
The four color's i've decided to use are the process colors, CMYK (Cayenne, Magenta, Yellow, and "Key line" (Black)). I haven't quite decided which track will be which color though.
Here is a picture from the attempt at photo emulsion:

Tuesday, March 16, 2010
GPS T-shirts
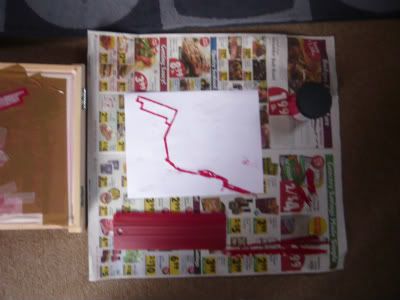
I came up with the idea of taking my tracks from the GPS device, taking a screen shot, tracing over it in Illustrator, and coming up with a design for the path. I then transferred the design to my screen so I could attempt to screen print it onto a shirt.
The method I used was called the fill in method where I printed out my design of the track and traced it with pencil onto the screen. I then filled in all the areas of the screen with ink filler that I didn't want ink to get through. I let it dry overnight and then tested my screen print on a piece of paper and it was a mess! There were a whole bunch of areas that the ink had bled through. I asked one of my friends who I knew had experience with screen printing for advice and he suggested putting tape over the areas that were messed up or where I didn't want the ink to get through. I did it again and tried it on a piece of paper, and the image was a lot more successful but not as smooth as I would like it.
I plan to test out and learn some other methods of getting my design on the screen so I can have a smoother image and eventually come up with some cool t-shirts like:
Vacation Shirt:
-Track all your road trips/vacations
-Track both the route there and back as one track. Trace over both in illustrator to get the design.
-Screen print a white t-shirt with new tracks each time you go on a new trip, using different colors for different trips.
Golden Gate Park Shirt/ Area Shirt:
-Explore different parts of Golden Gate Park tracking myself
-Make each area a different track.
-Make a different screen for each track and put the tracks on the shirt, using a different color for each track, in this case, representing a different part of the park
Here are some pictures from my first attempt at screen printing:
Tuesday, March 9, 2010
Winterguard and Movement
This weekend I was excited that we practiced outside because I was able to have my GPS device in my pocket during one of the run throughs of our show.
Our show is titled "Sleep" by Eric Whitacre. The show is written by Ben Wilkinson and co-written by Jaime Roman.
I took a screen shot of the path on Google Earth, took a picture of the screen of my GPS Device, and also drew my own path using my Bamboo pad in photoshop using my memory of where I go during the show.
Google Earth:

GPS Device:
(Not yet available)
Photoshop Drawn Path: (blue dot marks starting point)

Each image turned out to look pretty differently. If I had another opportunity to re-trace my path in the show with my GPS device, I would probably change the frequency of how often it makes a point to every second instead of every 5 seconds to get a more accurate path.
We also did our movement portion of practice on the beach. We practice "across the floors" which are doing different dance moves while traveling across the floor. We got a picture of the pathway in the sand after doing our across the floors and came up with this:

Wednesday, March 3, 2010
Weekend Video Map
When I saved all my files into one file, for some reason I can't get my tracks to show up on google earth. But the push pins are the places I went on Saturday and Sunday. Saturday I had traffic school and Sunday I had practice.
I took my tracks of the routes I took and traced them in illustrator, coming up with these:
The first one is an Image of my drive from San Francisco, to John Swett high school for practice, then after practice I drove up to Benicia for a little to see my family, and then Drove back down to San Francisco.
The second image is a map of me leaving my house, driving to traffic school, and then driving back home.


Go Cars Videos
Videos taken during Go Cars in San Francisco on February 11, 2010
Overall I really enjoyed Go Cars and had a lot of fun. I definitely would recommend it and would definitely do it again. I would like to travel and try go cars in another city other than San Francisco. Go Cars really let tourists see a city the way the locals see it, rather than just seeing all the touristy things that everybody sees.
The only thing I didn't like about go cars is that it was pretty hard to navigate back to the trail once we got lost.
Monday, February 8, 2010
Wandering
To wander, I decided to set up my own system on how I would wander through golden gate park. I would first start by walking down Lincoln starting at 24th avenue, so the avenue numbers increase as I walk down Lincoln. As soon as a bus passes, that will determine when and where I enter the park. After entering the park I will walk forward until and if I run into any of these situations:
- If I cross the path of a human or animal, I will then turn and travel in the direction of which they came from.
- If I walk too far through the park and hit Fulton, I will then make an 180 degree turn and walk back in the other direction.
- If I come within 5 feet of a orange or purple flower or plant, I will travel in the way the wind is blowing. If there is no wind, I will travel in the way the plant is “drooping.”
- If I smell good food, I will head towards it
- If I hear kids crying or screaming, I will travel away from it
I went out on Wednesday, February 3rd at 5 PM with my friend Jessica to see where we would end up. Unfortunately, it was very rare for one of the rules to come into play. We saw probably 2-3 purple and orange plants, never crossed the path of a human or animal, never hit Fulton, and never smelt food or heard kids crying or screaming. I probably would have had more rules come into effect if I would have went out earlier in the day or if I would have gone on a weekend.
While I was wandering I took some videos on my Flip digital video camera and uploaded them to youtube.
Leaving my house and explaining the rules:
A firetruck that passed us:
The bus passing:
Wandering in the park:
Purple Flowers:
Subscribe to:
Comments (Atom)